
티스토리 뷰
스프링은 개발자가 직접 DB 연동 코드를 작성하지 않고, SQL 구문만 수정하면 자동으로 사용이 가능하게끔 하는 JDBC Templete을 사용할 수 있는데, 이 좋은 기법을 수행하기 위해서는 몇 가지 사전 준비가 필요하다.
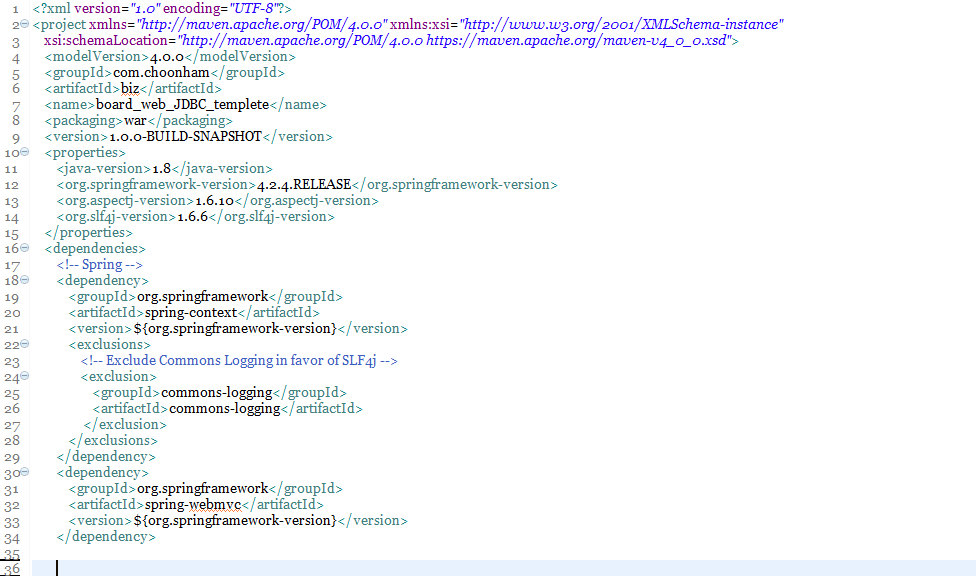
1. pom.xml 문서에 <dependency>를 이용하여 라이브러리들을 추가해야한다.
◎pom.xml
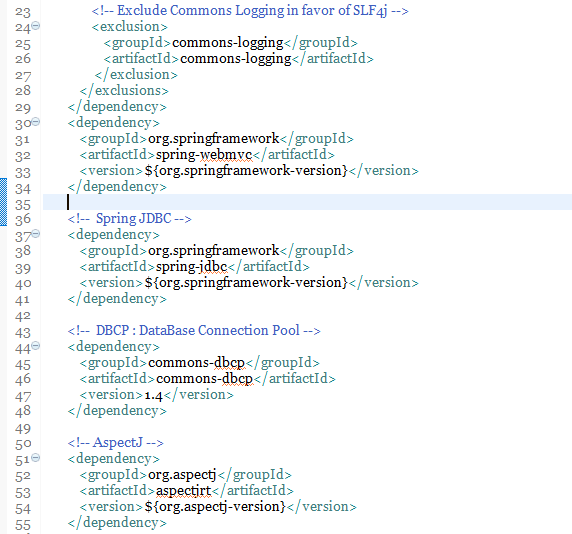
- Spring JDBC, DBCP(DataBase Connection Pool) 라이브러리 추가
◎pom.xml
2. DataSource 설정
JDBCTemplete 클래스가 JDBC API를 이용하여 DB 연동을 처리하려면 데이터베이스로부터 커넥션을 얻어와야 한다.
따라서 JDBCTemplete 객체가 사용할 DataSource를 bean 객체로 등록해야 한다.
DataSource 객체는 스프링 자체에서 지원해주기 때문에 이미 선언되어 있는 맴버 변수에 property를 이용하여 사용할 DB 드라이버와 url, id, pwd 를 설정해준다.
1) bean-config 파일 이용
◎applicationContext.xml
<?xml version="1.0" encoding="UTF-8"?>
<beans xmlns="http://www.springframework.org/schema/beans"
	xmlns:xsi="http://www.w3.org/2001/XMLSchema-instance"
	xsi:schemaLocation="http://www.springframework.org/schema/beans http://www.springframework.org/schema/beans/spring-beans.xsd">

	<!-- DataSource Config -->
	<bean id = "dataSource" class = "org.apache.commons.dbcp.BasicDataSource" destroy-method="close">
		<property name = "driverClassName" value = "oracle.jdbc.driver.OracleDriver"/>
		<property name = "url" value ="jdbc:oracle:thin:@127.0.0.1:1521:XE"/>
		<property name = "username" value = "choonham"/>
		<property name = "password" value = "6725"/>
	</bean>

</beans>
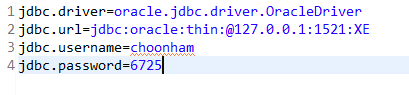
2) properties 파일 이용
bean config 파일을 수정하여 DataSource를 등록하여 사용할 수도 있지만, properties 파일을 하나 생성하여 이를 이용해 사용할 수도 있다.
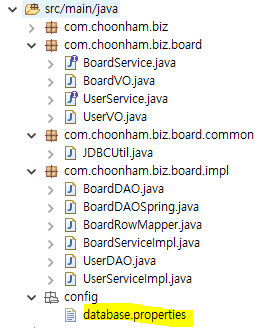
◎database.properties
properties 파일 작성을 마친 후에는 bean-config 파일에서 선언하여 등록해준다.
◎applicationContext.xml
<?xml version="1.0" encoding="UTF-8"?>
<beans xmlns="http://www.springframework.org/schema/beans"
	xmlns:xsi="http://www.w3.org/2001/XMLSchema-instance"
	xmlns:context="http://www.springframework.org/schema/context"
	xsi:schemaLocation="http://www.springframework.org/schema/beans http://www.springframework.org/schema/beans/spring-beans.xsd
		http://www.springframework.org/schema/context http://www.springframework.org/schema/context/spring-context-4.2.xsd">

	 <!-- DataSource Configuration properties 파일 이용 -->
	 <context:property-placeholder location="classpath:config/database.properties"/>

	<!-- DataSource Configuration -->
	<bean id = "dataSource" class = "org.apache.commons.dbcp.BasicDataSource" destroy-method="close">
		<property name = "driverClassName" value = "${jdbc.driver}"/>
		<property name = "url" value ="${jdbc.url}"/>
		<property name = "username" value = "${jdbc.name}"/>
		<property name = "password" value = "${jdbc.password}"/>
	</bean>

</beans>
3. Spring JDBC 등록
이제, 마지막으로 bean 객체를 이용하여 Spring JDBC를 등록하고, 생성해놓은 dataSource를 ref 하면 사전 준비는 끝이난다.
◎applicationContext.xml
<?xml version="1.0" encoding="UTF-8"?>
<beans xmlns="http://www.springframework.org/schema/beans"
	xmlns:xsi="http://www.w3.org/2001/XMLSchema-instance"
	xmlns:context="http://www.springframework.org/schema/context"
	xsi:schemaLocation="http://www.springframework.org/schema/beans http://www.springframework.org/schema/beans/spring-beans.xsd
		http://www.springframework.org/schema/context http://www.springframework.org/schema/context/spring-context-4.2.xsd">

	 <!-- DataSource Configuration properties 파일 이용 -->
	 <context:property-placeholder location="classpath:config/database.properties"/>

	<!-- DataSource Configuration -->
	<bean id = "dataSource" class = "org.apache.commons.dbcp.BasicDataSource" destroy-method="close">
		<property name = "driverClassName" value = "${jdbc.driver}"/>
		<property name = "url" value ="${jdbc.url}"/>
		<property name = "username" value = "${jdbc.name}"/>
		<property name = "password" value = "${jdbc.password}"/>
	</bean>


	<!--  Spring JDBC  -->
	<bean id = "jdbcTemplate" class = "org.springframework.jdbc.core.JdbcTemplate">
		<property name = "dataSource" ref ="dataSource"></property>
	</bean>

</beans>
'[JAVA] > Spring' 카테고리의 다른 글
| [Spring] AOP(Aspect Oriented Programming) (0) | 2021.06.17 |
|---|---|
| [Spring] Spring JDBC 2 : DAO Class 구현 (0) | 2021.06.17 |
| [Spring] Spring Project 제어 구조 (0) | 2021.06.16 |
| [Spring] bean 7 : 객체 자동 등록, component-scan (0) | 2021.06.16 |
| [Spring] bean 6: Collection 맵핑 (0) | 2021.06.16 |


- Async
- 맛집
- Promise
- react
- 파니노구스토
- 정보보안기사 #실기 #정리
- AsyncStorage
- redux-thunk
- javascript
- 이탈리안 레스토랑
- 인천 구월동 이탈리안 맛집
- 인천 구월동 맛집
- await
- react-native
- redux
- Total
- Today
- Yesterday