
티스토리 뷰
지금까지 Spring MVC 를 구현하면서 진행한 전체 작업을 "2-Layered" 아키텍쳐 스타일이라고 하며, 이를 그림으로 나타내면 다음과 같다.
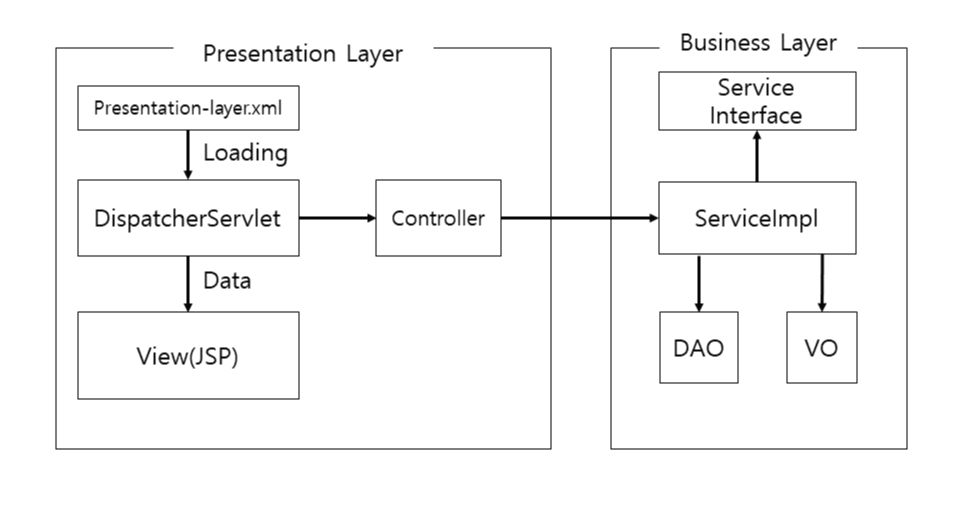
이때, presentation-layer 에서 Controller 가 서비스를 스캔할 수 있도록하는 설정 파일인 "presentation-layer.xml" 파일이 /WEB-INT/config 폴더 내에 존재하며, Controller객체들이 생성되기 전에 먼저 사용할 비즈니스 컴포넌트들을 메모리에 생성하기 위한 "applicationContext.xml" 파일이 src/main/resources 폴더에 존재한다.
Spring 초반부터 MVC 구현을 들어가기 직전까지 실습을 진행했던 DB. AOP 등과 같은 설정은 바로 이 applicationContext.xml 파일에서 수행하는 것이다.
즉, web.xml은 application 다음과 같은 전체 설정을 해줘야 한다는 것이다.
1. 인코딩
◎web.xml
 <filter>
    <filter-name>characterEncoding</filter-name>
    <filter-class>org.springframework.web.filter.CharacterEncodingFilter</filter-class>
    <init-param>
      <param-name>forceEncoding</param-name>
      <param-value>true</param-value>
    </init-param>
    <init-param>
      <param-name>encoding</param-name>
      <param-value>UTF-8</param-value>
    </init-param>
  </filter>
  <filter-mapping>
    <filter-name>characterEncoding</filter-name>
    <url-pattern>*.do</url-pattern>
  </filter-mapping>
2. DispatcherServlet 등록: presentation-layer.xml => 컨트롤러 등록을 위한 스캔 작업
◎web.xml
<servlet>
    <servlet-name>action</servlet-name>
    <servlet-class>org.springframework.web.servlet.DispatcherServlet</servlet-class>
    <init-param>
      <param-name>contextConfigLocation</param-name>
      <param-value>/WEB-INF/config/presentation-layer.xml</param-value>
    </init-param>
  </servlet>
  <servlet-mapping>
    <servlet-name>action</servlet-name>
    <url-pattern>*.do</url-pattern>
  </servlet-mapping>
3. 비즈니스 컴포넌트에 로딩에 대한 클래스 등록
applicationContext.xml => 1) 비즈니스 컴포넌트 등록을 위한 스캔 작업
2) 데이터베이스 처리에 관련된 등록 작업
3) AOP에 관련된 등록 작업
이때는 <Listener> 태그를 사용하여 ContextLoaderListener 클래스를 등록하면 된다. 이때, 스캔하는 Default 폴더가 /WEB-INT/apllicationContext.xml이다. 그렇기 때문에, src/main/resources 소스에 위치한 applicationContext.xml 을 읽어들일 수 있게 하기 위해서 다음과 같이 <context-param> 설정을 추가한다.
◎web.xml
 <context-param>
    <param-name>contextConfigLocation</param-name>
    <param-value>classPath:applicationContext.xml</param-value>
  </context-param>
  <listener>
    <listener-class>
  		org.springframework.web.context.ContextLoaderListener
  	</listener-class>
  </listener>
3번까지 추가된 전체적인 구조는 다음과 같다.

이때, 위 Root 컨테이너가 의미하는 것이 바로 applicationContext.xml, 중간에 위치한 것이 presentation-layer.xml파일이다.
'[JAVA] > Spring' 카테고리의 다른 글
| [Spring] 다국어 처리 (0) | 2021.06.28 |
|---|---|
| [Spring] 파일 업로드 (0) | 2021.06.28 |
| [Spring] Spring MVC 7: 비즈니스 컴포넌트 사용 (0) | 2021.06.28 |
| [Spring] Spring MVC 6: @SessionAttribute 어노테이션 (0) | 2021.06.23 |
| [Spring] Spring MVC 6: @ModelAttribute 어노테이션 (0) | 2021.06.23 |
- Async
- 인천 구월동 이탈리안 맛집
- react-native
- redux-thunk
- AsyncStorage
- Promise
- 이탈리안 레스토랑
- javascript
- redux
- react
- await
- 인천 구월동 맛집
- 파니노구스토
- 정보보안기사 #실기 #정리
- 맛집
- Total
- Today
- Yesterday