
티스토리 뷰
지금까지 정리한 개념을 모두 사용하여, Mybatis를 사용한 Spring 프로젝트를 하나 간단하게 만들어보자.
해당 Web App은 아래 완성 화면과 같이 할일을 등록하고 해당 업무를 "해야할 일", "진행 중", "완료" 의 3가지 카테고리로 나누어 표시하는, 간단한 스케쥴러이다.
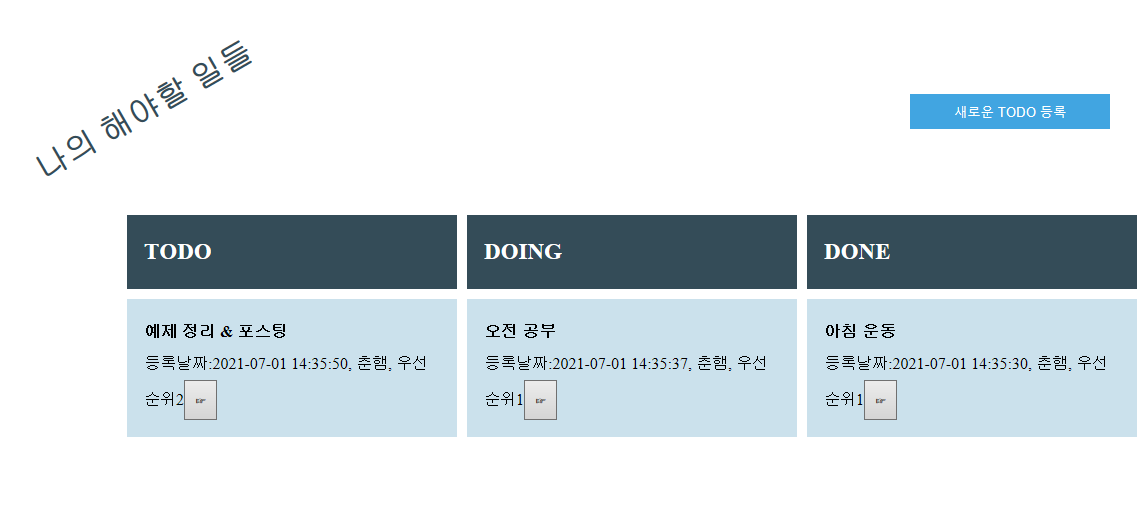
순위 우측에 버튼을 누르면, DB가 갱신되어 해당 업무의 진행 현황을 변경하는 동적인 Web App 이다.
바로 들어가보자.
1. 사용할 라이브러리 설치
◎pom.xml
<!--  Add Dependency For ToDo List Job -->

<!--  Mybatis -->
<dependency>
  <groupId>org.mybatis</groupId>
  <artifactId>mybatis</artifactId>
  <version>3.3.1</version>
</dependency>

<!--  Mybatis Spring -->
<dependency>
  <groupId>org.mybatis</groupId>
  <artifactId>mybatis-spring</artifactId>
  <version>1.2.4</version>
</dependency>

<!--  Spring JDBC -->
<dependency>
  <groupId>org.springframework</groupId>
  <artifactId>spring-jdbc</artifactId>
  <version>${org.springframework-version}</version>
</dependency>

<!-- DBCP : CONNECTION Pool -->
<dependency>
  <groupId>commons-dbcp</groupId>
  <artifactId>commons-dbcp</artifactId>
  <version>1.4</version>
</dependency>

<!-- Jackson2 : JSON -->
<dependency>
  <groupId>com.fasterxml.jackson.core</groupId>
  <artifactId>jackson-databind</artifactId>
  <version>2.7.2</version>
</dependency>

<!-- Lombok -->
<dependency>
  <groupId>org.projectlombok</groupId>
  <artifactId>lombok</artifactId>
  <version>1.16.18</version>
</dependency>
2. DataSource, Transaction 등 프로젝트 로드 시 사전에 등록해야할 객체 등록
◎root-context.xml
<?xml version="1.0" encoding="UTF-8"?>
<beans xmlns="http://www.springframework.org/schema/beans"
	xmlns:xsi="http://www.w3.org/2001/XMLSchema-instance"
	xsi:schemaLocation="http://www.springframework.org/schema/beans https://www.springframework.org/schema/beans/spring-beans.xsd">
	<!-- Root Context: defines shared resources visible to all other web components -->

	<!-- db.properties Registration For Read -->
	<bean class = "org.springframework.beans.factory.config.PropertyPlaceholderConfigurer">
		<property name = "location">
			<value>classpath:db.properties</value>
		</property>
	</bean>

	<!-- db.properties Read And Settings -->
	<bean id = "dataSource" class = "org.springframework.jdbc.datasource.DriverManagerDataSource">
		<property name = "driverClassName" value = "${jdbc.driverClassName}"></property>
		<property name = "url" value = "${jdbc.url}"></property>
		<property name = "username" value = "${jdbc.username}"></property>
		<property name = "password" value = "${jdbc.password}"></property>
	</bean>

	<!--  Transaction Registration -->
	<bean id = "transactionManager" class = "org.springframework.jdbc.datasource.DataSourceTransactionManager">
		<property name = "dataSource" ref = "dataSource"/>
	</bean>

	<!--  SqlSessionTemplate For MyBatis -->
	<bean id = "sqlSessionFactory" class = "org.mybatis.spring.SqlSessionFactoryBean">
		<property name="dataSource" ref = "dataSource"></property>
		<property name = "configLocation" value = "classpath:mybatis-config.xml"></property>
	</bean>

	<!--  SqlSession For MyBatis-->
	<bean id = "sqlSession" class = "org.mybatis.spring.SqlSessionTemplate">
		<constructor-arg index = "0" name = "sqlSessionFactory" ref = "sqlSessionFactory"></constructor-arg>
	</bean>
</beans>
◎db.properties
jdbc.driverClassName=oracle.jdbc.driver.OracleDriver
jdbc.url=jdbc:oracle:thin:@127.0.0.1:1521:XE
jdbc.username=choonham
jdbc.password=6725
3. 브라우저의 요청 사항을 처리할 servlet-context.xml 확인
◎servlet-context.xml
<?xml version="1.0" encoding="UTF-8"?>
<beans:beans xmlns="http://www.springframework.org/schema/mvc"
	xmlns:xsi="http://www.w3.org/2001/XMLSchema-instance"
	xmlns:beans="http://www.springframework.org/schema/beans"
	xmlns:context="http://www.springframework.org/schema/context"
	xsi:schemaLocation="http://www.springframework.org/schema/mvc https://www.springframework.org/schema/mvc/spring-mvc.xsd
		http://www.springframework.org/schema/beans https://www.springframework.org/schema/beans/spring-beans.xsd
		http://www.springframework.org/schema/context https://www.springframework.org/schema/context/spring-context.xsd">

	<!-- DispatcherServlet Context: defines this servlet's request-processing infrastructure -->

	<!-- Enables the Spring MVC @Controller programming model -->
	<annotation-driven />

	<!-- Handles HTTP GET requests for /resources/** by efficiently serving up static resources in the ${webappRoot}/resources directory -->
	<resources mapping="/resources/**" location="/resources/" />

	<!-- Resolves views selected for rendering by @Controllers to .jsp resources in the /WEB-INF/views directory -->
	<beans:bean class="org.springframework.web.servlet.view.InternalResourceViewResolver">
		<beans:property name="prefix" value="/WEB-INF/views/" />
		<beans:property name="suffix" value=".jsp" />
	</beans:bean>

	<context:component-scan base-package="com.choonham.tdl" />


</beans:beans>
4. DB 테이블 생성
DB는 다음과 같이 구성했다.

5. VO 객체 선언
◎Todo.java
package ajaxtodo.ajaxtest.todoajax.dto;

import lombok.Data;

@Data
public class Todo {

	private String id;
	private String name;
	private String title;
	private String regdate;
	private String sequence;
	private String type;

}
lumbok을 사용했기 때문에 따로 getter와 setter를 선언하지 않아도 사용 가능하다.
6. SqlSession 객체 (Mybatis 사용을 위함)를 사용하기 위한 인터페이스 작성
직전 포스팅에서 SqlSession을 사용하기 위한 방법을 2가지 설명했었다. 이번 예제는 그 중 2번 방법을 사용하여 메서드를 직접 선언하여 사용할 것이기 때문에 인터페이스를 생성해준다.
◎TodoMapper.java
package com.choonham.tdl.repository;

import java.util.List;

import com.choonham.tdl.dto.Todo;

public interface TodoMapper {
	public int insertTodo(Todo todo);
	public List<Todo> selectTodo();
	public int updateTodo(Todo todo);
}
7. sql-mapper.xml 작성
6번에서 작성한 인터페이스에 선언된 추상 메서드들이 SQL 구문을 실행하는 기능을 할 수 있도록 재정의하기 위한 mapper.xml 파일을 작성한다.
◎sql-mappers.xml
<?xml version="1.0" encoding="UTF-8"?>
<!DOCTYPE mapper PUBLIC "-//mybatis.org//DTD Mapper 3.0//EN" "http://mybatis.org/dtd/mybatis-3-mapper.dtd">
<!-- <mapper namespace="프로젝트 내에서 유일한 이름으로 설정"> -->
<mapper namespace="com.choonham.tdl.repository.TodoMapper">
<!--  -->

	<insert id="insertTodo" parameterType = "Todo">
		INSERT INTO todolist (
			id, title, name, sequence, type, regdate)
		VALUES (
			todoid.nextval,
			#{title},
			#{name},
			#{sequence},
			'TODO',
			sysdate )
	</insert>

	<select id="selectTodo" resultType = "Todo">
		SELECT
			id, title, name, sequence, type, regdate
		FROM
			todolist
		ORDER BY
			regdate DESC
	</select>

	<update id = "updateTodo" parameterType = "Todo">
		UPDATE todolist SET
		<if test="type== 'TODO'">
			type='DOING'
		</if>
		<if test="type=='DOING'">
			type='DONE'
		</if>
		WHERE id = #{id}
	</update>

</mapper>
8. mybatis 설정 파일 작성
7번에서 설정한 parameterType, resultType 과 mappers.xml 파일 자체를 등록할 mybatis 설정 파일을 작성한다.
◎mybatis-config.xml
<?xml version="1.0" encoding="UTF-8"?>
<!DOCTYPE configuration PUBLIC "-//mybatis.org//DTD config 3.0//EN" "http://mybatis.org/dtd/mybatis-3-config.dtd">
<configuration>
	<typeAliases>
		<typeAlias type = "com.choonham.tdl.dto.Todo" alias = "Todo"/>
	</typeAliases>
	<mappers>
		<!--  resource 경로 : 상대 경로 -->
		<mapper resource="mapper/sql-mappings.xml"></mapper>
	</mappers>
</configuration>
9. DAO 작성
SQL구문을 사용하기 위한 인터페이스와 mapping 작업이 모두 끝났으므로, 이제 실질적으로 이를 호출할 DAO 객체를 작성한다.
◎Repository.java
package com.choonham.tdl.repository;

import java.util.ArrayList;
import java.util.List;

import org.apache.ibatis.session.SqlSession;
import org.springframework.beans.factory.annotation.Autowired;
import org.springframework.stereotype.Repository;

import com.choonham.tdl.dto.Todo;

@Repository
public class TodoRepository {

	@Autowired
	SqlSession sqlSession;
	//SqlSession 객체 내부에는 TodoMapper 인터페이스를 이용해서, 해당 메서드들이 가지고 있는 추상 메서드들을 직접 사용할 수 있다.
	// getMapper(반드시 interface.class) => 반환 클래스: 해당 인터페이스


	public TodoRepository() {
		// TODO Auto-generated constructor stub
	}

	public int insertTodo(Todo todo) {
		int result = 0;
		TodoMapper mapper = sqlSession.getMapper(TodoMapper.class);

		try {
			result = mapper.insertTodo(todo);
		} catch(Exception e){
			e.printStackTrace();
		}
		return 0;
	}

	public List<Todo> selectTodo() {
		List<Todo> result = new ArrayList<Todo>();

		TodoMapper mapper = sqlSession.getMapper(TodoMapper.class);

		try{
			System.out.println("2");
			result = mapper.selectTodo();
		} catch(Exception e){
			e.printStackTrace();
		}
		return result;
	}

	public int updateTodo(Todo todo) {
		int result = 0;
		TodoMapper mapper = sqlSession.getMapper(TodoMapper.class);
		try{
			result = mapper.updateTodo(todo);
		}catch(Exception e){
			e.printStackTrace();
		}
		return result;
	}

}
10. Controller작성
이제 위 DAO를 직접 호출하고, 그 결과값을 view에게 넘겨줄 Controller를 작성하자.
◎HomeController.java(프로젝트가 로드되면 main.jsp로 selectForm 의 결과값과 함께 이동)
package com.choonham.tdl;

import java.util.List;
import java.util.Locale;

import org.slf4j.Logger;
import org.slf4j.LoggerFactory;
import org.springframework.beans.factory.annotation.Autowired;
import org.springframework.stereotype.Controller;
import org.springframework.ui.Model;
import org.springframework.web.bind.annotation.RequestMapping;
import org.springframework.web.bind.annotation.RequestMethod;

import com.choonham.tdl.dto.Todo;
import com.choonham.tdl.repository.TodoRepository;

/**
 * Handles requests for the application home page.
 */
@Controller
public class HomeController {

	private static final Logger logger = LoggerFactory.getLogger(HomeController.class);

	/**
	 * Simply selects the home view to render by returning its name.
	 */
	@Autowired
	TodoRepository repo;

	@RequestMapping(value = "/", method = RequestMethod.GET)
	public String home(Locale locale, Model model) {
		List<Todo> todo = repo.selectTodo();
		model.addAttribute("todoList", todo);
		return "main";
	}

}
◎TodoController.java
package com.choonham.tdl.controller;

import java.util.List;

import org.springframework.beans.factory.annotation.Autowired;
import org.springframework.stereotype.Controller;
import org.springframework.web.bind.annotation.RequestMapping;
import org.springframework.web.bind.annotation.RequestMethod;
import org.springframework.web.bind.annotation.ResponseBody;

import com.choonham.tdl.dto.Todo;
import com.choonham.tdl.repository.TodoRepository;

@Controller
public class TodoController {

	 @Autowired
	 TodoRepository repo;

	 //TODO 추가 화면
	 @RequestMapping(value = "/TodoForm", method = RequestMethod.GET)
	 public String TodoForm() {
		 return "todoForm";
	 }

	 @RequestMapping(value="/TodoAdd",  method = RequestMethod.POST )
	 public  String TodoAdd(Todo todo){
		 repo.insertTodo(todo);
		 return "redirect:/"; // '/' 요청을 보냄 to homeController
	 }

	 @RequestMapping(value="/updateTodo",  method = RequestMethod.POST )
	 public  @ResponseBody List<Todo>TodoUpdate(Todo todo){
		 repo.updateTodo(todo);
		 return repo.selectTodo();
	 }
	public TodoController() {
		// TODO Auto-generated constructor stub
	}

}
11. Front(view) 작성
이제 클라이언트의 요청을 받을 Front JSP 파일들을 생성해주자. (css 는 생략)
◎main.jsp
<%@ page contentType="text/html; charset=UTF-8" pageEncoding="UTF-8" language="java" %>

<%@ taglib uri="http://java.sun.com/jsp/jstl/core" prefix="c" %>
<%@ page isELIgnored="false" %>
<!DOCTYPE html>
<html>
<head>
<meta charset="UTF-8">
<title>TODO LIST</title>
<script src="https://ajax.googleapis.com/ajax/libs/jquery/3.4.1/jquery.min.js"></script>

<script>
	$(function(){

        buttonEvent();

		function buttonEvent(){

			$("button").click(function(){

				var type=$(this).attr("data-type");
				var id=$(this).attr("data-id");

				$.ajax({
					url:"updateTodo",  //http://~~/updateTodo?type=type&id=id
					data:{
						type:type,
						id:id
					},
					type:"post",
					success:function(serverData){

						$("#todo").html("<tr><th>TODO</th></tr>");
						$("#doing").html("<tr><th>DOING</th></tr>");
						$("#done").html("<tr><th>DONE</th></tr>");

						for(var i=0;i<serverData.length;i++){

							var str="";

							if(serverData[i].type=='TODO'){

								str+='<tr id="'+serverData[i].id+'">';
								str+='<td class="todoUpdate"><b>'+serverData[i].title+'</b><br /> 등록날짜:'+serverData[i].regdate+', '+serverData[i].name+', 우선순위'+serverData[i].sequence+'';
								str+='<button data-id="'+serverData[i].id+'" data-type="'+serverData[i].type+'">☞</button>';
								str+='</td>';
								str+='</tr>';

								$("#todo").append(str);

							}else if(serverData[i].type=='DOING'){

								str+='<tr id="'+serverData[i].id+'">';
								str+='<td class="todoUpdate"><b>'+serverData[i].title+'</b><br /> 등록날짜:'+serverData[i].regdate+', '+serverData[i].name+', 우선순위'+serverData[i].sequence+'';
								str+='<button data-id="'+serverData[i].id+'" data-type="'+serverData[i].type+'">☞</button>';
								str+='</td>';
								str+='</tr>';

								$("#doing").append(str);

							}else{//DONE

								str+='<tr id="'+serverData[i].id+'">';
								str+='<td class="todoUpdate"><b>'+serverData[i].title+'</b><br /> 등록날짜:'+serverData[i].regdate+', '+serverData[i].name+', 우선순위'+serverData[i].sequence+'';
								str+='<button data-id="'+serverData[i].id+'" data-type="'+serverData[i].type+'">☞</button>';
								str+='</td>';
								str+='</tr>';

								$("#done").append(str);
							}
						} // for() END

						buttonEvent();
					} // success:function(){} END
				});	// $.ajax({}) END
			});	// $("button").click() END
		}	// function buttonEvent(){} END
	});
</script>

</head>
<body>

	<div class="all">

		<table id="thTable" class="headerTable">
			<tr>
				<td class="headerTable">
					<div class="title"><h1>나의 해야할 일들</h1></div>
				</td>
				<td class="headerTable"></td>
				<td class="headerTable">
					<div class="button">
						<form action="TodoForm">
							<input type="submit" value="새로운 TODO 등록">
						</form>
					</div>
				</td>
			</tr>
		</table> <!-- <table id="thTable" class="headerTable"> -->

		<!-- main.jsp에서는 전달받은 결과를 JSTL 과 EL을 이용해 출력. -->
		<div class="context">

			<!-- 해야 할일 TODO -->
			<div>
				<table id="todo">
					<tr>
						<th>TODO : 해야 할 일</th>
					</tr>
					<c:forEach var="todo" items="${todoList}">
						<c:if test="${todo.type=='TODO'}">
							<tr id="${todo.id}">
								<td class="todoUpdate">
									<b>${todo.title}</b><br />
									등록날짜:${todo.regdate}, ${todo.name}, 우선순위${todo.sequence}
									<button data-id="${todo.id}" data-type="${todo.type}">></button>
								</td>
							</tr>
						</c:if>
					</c:forEach>
				</table> <!-- <table id="todo"> -->
			</div> <!-- <div class="context"> -->

			<!-- 현재 작업 중인 TODO -->
			<div>
				<table id="doing">
					<tr>
						<th>DOING : 현재 하고 있는 일</th>
					</tr>
					<c:forEach var="todo" items="${todoList}">
						<c:if test="${todo.type=='DOING'}">
							<tr id="${todo.id}">
								<td class="todoUpdate">
									<b>${todo.title}</b><br />
									등록날짜:${todo.regdate}, ${todo.name}, 우선순위${todo.sequence}
									<button data-id="${todo.id}" data-type="${todo.type}">☞</button>
								</td>
							</tr>
						</c:if>
					</c:forEach>
				</table> <!-- <table id="doing"> -->
			</div>

			<!-- 작업 완료된 TODO -->
			<div>
				<table id="done">
					<tr>
						<th>DONE : 작업이 완료된 일들</th>
					</tr>
					<c:forEach var="todo" items="${todoList}">
						<c:if test="${todo.type=='DONE'}">
							<tr id="${todo.id}">
								<td class="todoUpdate">
									<b>${todo.title}</b><br />
									 등록날짜:${todo.regdate}, ${todo.name}, 우선순위${todo.sequence}
								</td>
							</tr>
						</c:if>
					</c:forEach>
				</table> <!-- <table id="done"> -->
			</div>

		</div> <!-- <div class="context"> -->
	</div> <!-- <div class="all"> -->
</body>
</html>
main.jsp 에서 ajax로 해당 작업의 id와 type(작업 진행 현황) 정보를 /updateForm 으로 요청을 보내면, Controller 에서 이를 처리 후 @ResponseBody 어노테이션이 작성된 데이터의 형태로 다시금 main.jsp에 넘겨 처리하는 구조이다.
◎todoForm.jsp
<%@ page contentType="text/html; charset=UTF-8" pageEncoding="UTF-8"
language="java"%>
<%@ taglib uri="http://java.sun.com/jsp/jstl/core" prefix="c"%>
<%@ page isELIgnored="false"%>
<!DOCTYPE html>
<html>
<head>
<meta charset="UTF-8">
<title>TODO FORM</title>
</head>
<body>
<div class="all">
<h1>할일 등록</h1>
<div class="context">
<form action="TodoAdd" onsubmit="" method="post">
<label>어떤일인가요?</label> <br />
<input type="text" name="title" id="title" maxlength="24" placeholder="jQuery공부하기(24자까지)" required="required" /><br />
<label>누가할일인가요?</label><br />
<input type="text" name="name" id="name" placeholder="홍길동" required="required" /><br />
<label>우선순위</label><br />
<input type="radio" name="sequence" value="1" checked /> 1
<input type="radio" name="sequence" value="2" /> 2
<input type="radio" name="sequence" value="3" /> 3 <br /> <br />
<div id="buttons">
<input id="back" type="button" value="< 이전" />
<input type="submit" value="제출" />
<input type="reset" value="내용지우기" />
</div>
</form>
<form action="./" id="goMain"></form>
</div>
</div>
</body>
</html>
12. 모든 요청에 대한 한글 인코딩, 필터 설정
◎web.xml
<?xml version="1.0" encoding="UTF-8"?>
<web-app version="2.5" xmlns="http://java.sun.com/xml/ns/javaee"
	xmlns:xsi="http://www.w3.org/2001/XMLSchema-instance"
	xsi:schemaLocation="http://java.sun.com/xml/ns/javaee https://java.sun.com/xml/ns/javaee/web-app_2_5.xsd">

	<filter>
 		 <filter-name>characterEncoding</filter-name>
  		<filter-class>org.springframework.web.filter.CharacterEncodingFilter</filter-class>
  		<init-param>
    		<param-name>encoding</param-name>
    		<param-value>UTF-8</param-value>
  		</init-param>
	</filter>

	<filter-mapping>
    	<filter-name>characterEncoding</filter-name>
    	<url-pattern>*</url-pattern>
  	</filter-mapping>

	<!-- The definition of the Root Spring Container shared by all Servlets and Filters -->
	<context-param>
		<param-name>contextConfigLocation</param-name>
		<param-value>/WEB-INF/spring/root-context.xml</param-value>
	</context-param>

	<!-- Creates the Spring Container shared by all Servlets and Filters -->
	<listener>
		<listener-class>org.springframework.web.context.ContextLoaderListener</listener-class>
	</listener>

	<!-- Processes application requests -->
	<servlet>
		<servlet-name>appServlet</servlet-name>
		<servlet-class>org.springframework.web.servlet.DispatcherServlet</servlet-class>
		<init-param>
			<param-name>contextConfigLocation</param-name>
			<param-value>/WEB-INF/spring/appServlet/servlet-context.xml</param-value>
		</init-param>
		<load-on-startup>1</load-on-startup>
	</servlet>

	<servlet-mapping>
		<servlet-name>appServlet</servlet-name>
		<url-pattern>/</url-pattern>
	</servlet-mapping>

</web-app>
전체 프로젝트의 파일 구조는 다음과 같다.
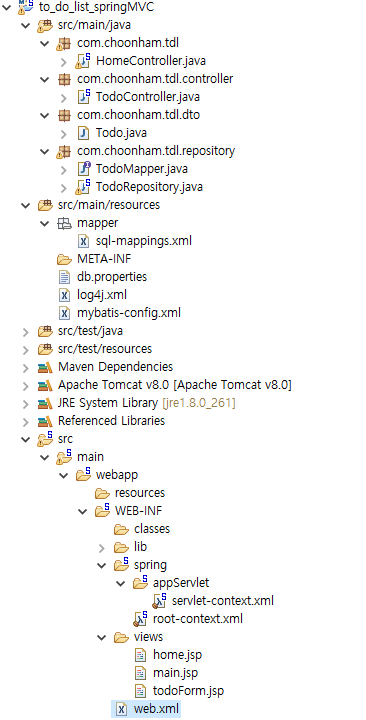
완성도가 엄청 높다거나 한 프로젝트는 아니지만, 아주 간단하게 Spring-Mybatis-jsp 까지의 데이터 흐름을 좀 더 이해하기 위한 좋은 실습이다.
'[JAVA] > Spring' 카테고리의 다른 글
| [Spring] log4j2, slf4j, AspectJ를 적용한 Logger (0) | 2022.01.27 |
|---|---|
| [Spring] Gradle기반 Spring Project 생성 (0) | 2022.01.18 |
| [Spring] JSON & XML 형식으로 데이터 변환 (0) | 2021.06.28 |
| [Spring] 다국어 처리 (0) | 2021.06.28 |
| [Spring] 파일 업로드 (0) | 2021.06.28 |


- redux
- 인천 구월동 맛집
- AsyncStorage
- 이탈리안 레스토랑
- 인천 구월동 이탈리안 맛집
- Promise
- Async
- redux-thunk
- react
- react-native
- await
- 맛집
- 정보보안기사 #실기 #정리
- javascript
- 파니노구스토
- Total
- Today
- Yesterday