
티스토리 뷰
일반적인 뷰 객체가 아닌 여러 개의 아이템 중에 하나를 선택할 수 있는 리스트 모양의 위젯을 안드로이드에서는 선택 위젯이라고 부르며 일반 위젯과는 구별하여 사용한다.
선택 위젯이 어댑터 패턴을 통해서 데이터를 관리하기 때문인데, 이 어댑터 패턴은 원본 데이터를 뷰에 직접 설정하지 않고 어댑터 클래스를 사용하여 선택 위젯에 보이는 각 아이템이 화면에 표시되기 전에 어댑터의 getView() 메서드를 호출하여 아이템을 반환받아 뷰에 표시하는 특징이 있다.
리사이클러 뷰는 각각의 아이템이 화면에 보일 때 메모리를 효율적으로 사용하도록 캐시를 구현하고 있기 때문에 일반적인 리스트뷰 보다 사용이 권장된다.
바로 한번 확인해보자.
우선, activity_main 레이아웃 내부에 리사이클러 뷰를 구성한다.
◎acitivyt_main.xml
<?xml version="1.0" encoding="utf-8"?>
<LinearLayout
        xmlns:android="http://schemas.android.com/apk/res/android"
        xmlns:tools="http://schemas.android.com/tools"
        xmlns:app="http://schemas.android.com/apk/res-auto"
        android:layout_width="match_parent"
        android:layout_height="match_parent"
        tools:context=".MainActivity" android:orientation="vertical">
    <androidx.recyclerview.widget.RecyclerView
            android:layout_width="match_parent"
            android:layout_height="match_parent"
            android:id="@+id/recyclerView"
    />
</LinearLayout>
그리고 어댑터 안에 들어갈 각 아이템의 데이터 클래스를 하나 구성해준다.
◎Person.java
package com.example.samplerecyclerview;

public class Person {
    private String name;
    private String mobile;

    public Person(String name, String mobile) {
        this.setMobile(mobile);
        this.setName(name);
    }

    public String getName() {
        return name;
    }

    public void setName(String name) {
        this.name = name;
    }

    public String getMobile() {
        return mobile;
    }

    public void setMobile(String mobile) {
        this.mobile = mobile;
    }
}
이후 리사이클러 뷰 내부에 데이터를 가질 카드뷰 레이아웃을 다음과 같이 생성한다.
◎person_item.xml
<?xml version="1.0" encoding="utf-8"?>
<LinearLayout xmlns:android="http://schemas.android.com/apk/res/android"
              xmlns:app="http://schemas.android.com/apk/res-auto" android:layout_width="match_parent"
              android:layout_height="wrap_content" android:orientation="vertical">

    <androidx.cardview.widget.CardView
            android:layout_width="match_parent"
            android:layout_height="wrap_content"
            app:cardCornerRadius="10dp"
            app:cardElevation="5dp"
            app:cardUseCompatPadding="true"
    >
        <LinearLayout
                android:orientation="horizontal"
                android:layout_width="match_parent"
                android:layout_height="wrap_content">
            <ImageView
                    android:layout_width="131dp"
                    android:layout_height="80dp" app:srcCompat="@drawable/ic_launcher_foreground"
                    android:id="@+id/imageView" android:layout_weight="1"/>
            <LinearLayout
                    android:orientation="vertical"
                    android:layout_width="match_parent"
                    android:layout_height="match_parent"
                    android:layout_margin="5dp"
                    android:layout_weight="1">
                <TextView
                        android:text="이름"
                        android:layout_width="match_parent"
                        android:layout_height="wrap_content" android:id="@+id/textView"
                        android:textSize="30sp"
                />
                <TextView
                        android:text="전화번호"
                        android:layout_width="match_parent"
                        android:layout_height="wrap_content" android:id="@+id/textView2"
                        android:textSize="15sp"/>
            </LinearLayout>
        </LinearLayout>
    </androidx.cardview.widget.CardView>
</LinearLayout>
이제, 각 뷰 객체를 가지고 담을 어댑터 객체를 생성해줘야 한다.
RecyclerView에 정의되어 있는 Adapter객체는 리스트에 보여질 각 아이템 데이터를 담고 있는 ViewHolder 객체를 가진다.
따라서 Adapter 클래스에 static으로 ViewHolder 객체를 생성한 뒤, ViewHolder객체의 생성자 메서드에 카드뷰의 텍스트 객체를 설정하게끔 구성한 뒤, 이를 Apapter객체에 담아서 PersonAdapter 클래스가 상속하도록 구성해야 한다.
◎PersonAdapter.java
package com.example.samplerecyclerview;

import android.view.LayoutInflater;
import android.view.View;
import android.view.ViewGroup;
import android.widget.TextView;
import androidx.annotation.NonNull;
import androidx.recyclerview.widget.RecyclerView;

import java.util.ArrayList;

public class PersonAdapter extends RecyclerView.Adapter<PersonAdapter.ViewHolder> {
    ArrayList<Person> items = new ArrayList<>();

    @NonNull
    @Override
    // 뷰 홀더 객체가 생성될 때 호출
    public ViewHolder onCreateViewHolder(@NonNull ViewGroup parent, int viewType) {
        // 뷰 객체를 만들기 위한 인플레이션
        LayoutInflater inflater = LayoutInflater.from(parent.getContext());
        View itemView = inflater.inflate(R.layout.person_item, parent, false);

        // 뷰홀더 객체를 생성하면서 뷰 객체를 전달하고 객체 반환환
       return new ViewHolder(itemView);
    }

    @Override
    // 뷰 홀더 객체가 재사용될 때 호출
    public void onBindViewHolder(@NonNull ViewHolder holder, int position) {
        Person item = items.get(position);
        holder.setItem(item);
    }

    @Override
    public int getItemCount() { // 어댑터에서 관리하는 아이템의 갯수
        return items.size();
    }

    public void addItem(Person item) {
        items.add(item);
    }

    public void setItems(ArrayList<Person> items) {
        this.items = items;
    }

    public Person getItems(int position) {
        return items.get(position);
    }

    public void setItem(int position, Person item) {
        items.set(position, item);
    }

    /*
    * 리스트 형태로 보일 때, 각각의 아이템은 뷰로 만들어지며 각각의 아이템을 위한 뷰는
    * ViewHolder에 담아둔다.
    */
    static class ViewHolder extends RecyclerView.ViewHolder { //View를 가지고 있기 위한 ViewHolder
        TextView textView;
        TextView textView2;

        //생성자로 View 객체 전달
        public ViewHolder(@NonNull View itemView) {
            super(itemView);

            textView = itemView.findViewById(R.id.textView);
            textView2 = itemView.findViewById(R.id.textView2);
        }

        // 전달받은 View객체의 아이템 설정
        public void setItem(Person item) {
            textView.setText(item.getName());
            textView2.setText(item.getMobile());
        }
    }

}
마지막으로 MainActivity에서 아래와 같이 어댑터 객체를 선언하여 리사이클러 뷰에 할당해주면 된다.
◎MainActivity.java
package com.example.samplerecyclerview;
import android.widget.LinearLayout;
import androidx.appcompat.app.AppCompatActivity;
import android.os.Bundle;
import androidx.recyclerview.widget.LinearLayoutManager;
import androidx.recyclerview.widget.RecyclerView;
public class MainActivity extends AppCompatActivity {
@Override
protected void onCreate(Bundle savedInstanceState) {
super.onCreate(savedInstanceState);
setContentView(R.layout.activity_main);
RecyclerView recyclerView = findViewById(R.id.recyclerView);
LinearLayoutManager linearLayoutManager = new LinearLayoutManager(this, LinearLayoutManager.VERTICAL, false);
recyclerView.setLayoutManager(linearLayoutManager);
PersonAdapter adapter = new PersonAdapter();
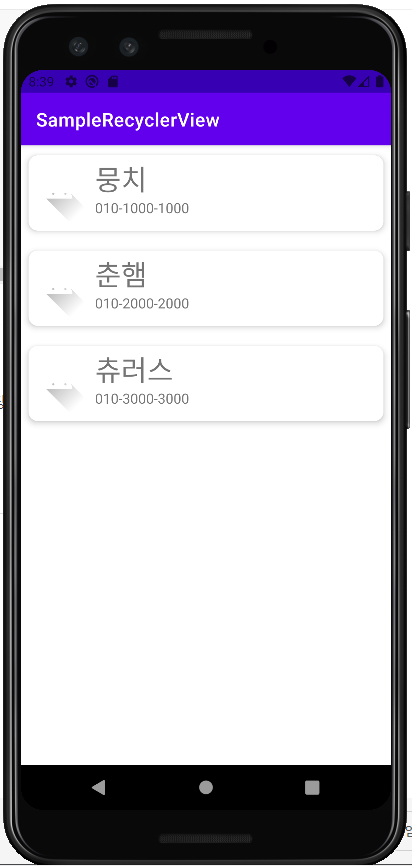
adapter.addItem(new Person("뭉치", "010-1000-1000"));
adapter.addItem(new Person("춘햄", "010-2000-2000"));
adapter.addItem(new Person("츄러스", "010-3000-3000"));
recyclerView.setAdapter(adapter);
}
}이때, 리사이클러 뷰 객체에 LinearLayouManager라는 객체를 할당했는데, 이는 리사이클러 뷰가 보일 기본적인 형태를 설정할 때 사용한다.
다시 말해, 만약 그리드 형태의 리스트를 사용하고 싶다면 GridLayoutManager객체를 할당해주면 해당 리사이클러 뷰는 그리드 레이아웃으로 구성이 된다는 뜻이다.
'Mobile > Android' 카테고리의 다른 글
| [Android] Thread & Handler (0) | 2022.04.05 |
|---|---|
| [Android] 선택 위젯 4: Spinner (0) | 2022.04.03 |
| [Android] 선택 위젯 2: CardView (0) | 2022.04.02 |
| [Android] 선택 위젯 1: 새로운 뷰 객체 생성 (0) | 2022.04.02 |
| [Android] 위험 권한 (0) | 2022.03.31 |


- 인천 구월동 이탈리안 맛집
- await
- 인천 구월동 맛집
- react-native
- 이탈리안 레스토랑
- javascript
- 맛집
- Promise
- AsyncStorage
- redux-thunk
- redux
- 정보보안기사 #실기 #정리
- 파니노구스토
- Async
- react
- Total
- Today
- Yesterday