티스토리 뷰
리액트 웹 App에서 API 서버를 연동할 때는 API 요청에 대한 상태도 잘 관리해야 한다. 예를 들어, 요청이 시작되었을 때는 로딩 중임을, 요청이 성공하거나 실패했을 때는 로딩이 끝났음을 명시해야 한다.
요청이 성공하면 서버에서 받아 온 응답에 대한 상태를 관리하고, 요청이 실패하면 서버에서 반환한 에러에 대한 상태를 관리해야 한다.
리액트 프로젝트에서 리덕스를 사용하고 있으며 이러한 비동기 작업을 관리해야 한다면, 미들웨어를 사용하여 매우 효율적이고 편하게 상태 관리를 할 수 있다.
우선, 미들웨어를 사용해보기 전에 간단한 작업 환경을 만들어주자.
작업 환경 준비
리덕스로 상태를 관리하는 간단한 카운터 예제를 우선 만들고, 그 위에 미들웨어를 적용해보자.
◎modules/counter.js
import {createAction, handleActions} from "redux-actions";

const INCREASE = 'counter/INCREASE';
const DECREASE = 'counter/DECREASE';

export const increase = createAction(INCREASE);
export const decrease = createAction(DECREASE);

const initialState = 0;

const counter = handleActions(
    {
        [INCREASE]: state => state + 1,
        [DECREASE]: state => state - 1
    },
    initialState
);

export default counter;
◎modules/index.js
import {combineReducers} from "redux";
import counter from "./counter";

const rootReducer = combineReducers({
    counter
});

export default rootReducer;
◎index.js
import React from 'react';
import ReactDOM from 'react-dom/client';
import './index.css';
import App from './App';
import {createStore} from "redux";
import rootReducer from "./modules";
import {Provider} from "react-redux";

const store = createStore(rootReducer);

const root = ReactDOM.createRoot(document.getElementById('root'));
root.render(
    <Provider store={store}>
        <App/>
    </Provider>
);
◎components/Counter.js
const Counter = ({ onIncrease, onDecrease, number }) => {
    return (
        <div>
            <h1>{number}</h1>
            <button onClick={onIncrease}>+1</button>
            <button onClick={onDecrease}>-1</button>
        </div>
    );
};

export default Counter;
◎containers/CounterContainer.js
import {connect} from 'react-redux';
import {increase, decrease} from "../modules/counter";
import Counter from "../components/Counter";

const CounterContainer = ({number, increase, decrease})  => {
    return (
        <Counter number={number} onIncrease={increase} onDecrease={decrease} />
    );
};

export default connect(
    state => ({
        number: state.counter
    }),
    {
        increase,
        decrease
    }
)(CounterContainer);
◎App.js
import './App.css';
import CounterContainer from "./containers/CounterContainer";

function App() {
  return (
    <>
      <CounterContainer/>
    </>
  );
}

export default App;
위 코드는 리덕스를 리액트 프로젝트에 적용해보는 직전 예제에서 다룬 코드와 동일하기 때문에 따로 설명은 생략하겠다.

이렇게 우선, 리덕스로 상태를 관리하는 간단한 카운터를 만들었다.
이제 미들웨어가 무엇인지 자세히 다뤄보자.
미들웨어
리덕스 미들웨어는 액션을 디스패치했을 때 리듀서에서 이를 처리하기에 앞서 사전에 지정된 작업들을 실행한다.
즉, 액션과 리듀서 사이의 중간자라고 볼 수 있다.
리듀서가 액션을 처리하기 전에 미들웨어가 할 수 있는 작업은 여러 가지가 있다. 전달받은 액션을 단순히 콘솔에 기록하거나, 전달받은 액션 정보를 기반으로 액션을 아예 취소하거나, 다른 종류의 액션을 추가로 디스패치할 수도 있다.
보통은 다른 개발자가 만들어 놓은 미들웨어를 사용하면 되기 때문에 실제로 프로젝트 작업할 때 미들웨어를 직접 만들어서 사용할 일은 그리 많지 않다.
하지만, 미들웨어가 어떻게 작동하는 지 제대로 이해하려면 직접 만들어 보는 것이 가장 좋으니, 한번 만들어 보려고 한다.
◎lib/loggerMiddleware.js
const loggerMiddleware = store => next => action => {
    // 미들웨어 기본 구조
};

export default loggerMiddleware;
화살표 함수를 연달아서 사용했는데, 이는 결국 아래와 같은 코드이다.
const loggerMiddleware = function loggerMiddleware(store) {
	return function(next) {
    	return function(action) {
        	// 미들웨어 기본 구조
        }
    }
}
미들웨어는 결국 함수를 반환하는 함수를 반환하는 함수이다. 여기에 있는 함수에서 파라미터로 받아 오는 store는 리덕스 스토어 인스턴스를, action은 디스패치된 액션을 가리킨다. next 파라미터는 함수의 형태이며, store.dispatch와 비슷한 역할을 한다.
즉, next(action)을 호출하면 그 다음 처리해야 할 미들웨어에게 액션을 넘겨주고, 만약 그 다음 미들웨어가 없다면, 리듀서에게 액션을 넘겨준다는 것이다.
한번 구현해보자.
◎lib/loggerMiddleware.js
const loggerMiddleware = store => next => action => {
    console.group(action && action.type); // 액션 타입으로 log를 그룹화함
    console.log('이전 상태', store.getState());
    console.log('액션', action);
    next(action); // 다음 미들웨어 혹은 리듀서에게 전달
    console.log('다음 상태', store.getState()); // 업데이트된 상태
    console.groupEnd(); // 그룹 끝
};

export default loggerMiddleware;
이렇게 만든 리덕스 미들웨어는 스토어를 생성하는 과정에서 적용한다.
◎index.js
import React from 'react';
import ReactDOM from 'react-dom/client';
import './index.css';
import App from './App';
import {applyMiddleware, createStore} from "redux";
import rootReducer from "./modules";
import {Provider} from "react-redux";
import loggerMiddleware from "./lib/loggerMiddleware";

const store = createStore(rootReducer, applyMiddleware(loggerMiddleware));

const root = ReactDOM.createRoot(document.getElementById('root'));
root.render(
    <Provider store={store}>
        <App/>
    </Provider>
);
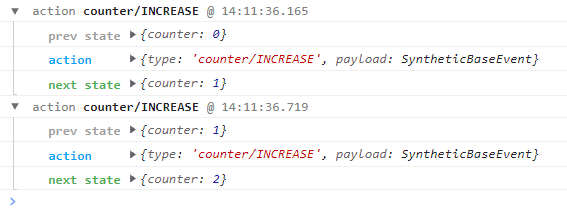
이제 카운터 앱에서 콜솔을 열고 확인해보면,

버튼을 눌러 액션을 디스패치할 때마다 console 그룹이 뜨는 걸 확인할 수 있다.
미들웨어에서는 여러 종류의 작업을 처리할 수 있다. 특정 조건에 따라 액션을 무시하게 할 수도 있고, 특정 조건에 따라 액션 정보를 가로채서 변경한 후 리듀서에게 전달할 수도 있다. 아니면 특정 액션에 기반하여 새로운 액션을 여러 번 디스패치할 수도 있다.
이러한 미들웨어 속성을 사용하여 네트워크 요청과 같은 비동기 작업을 관리하면 매우 유용하다.
redux-logger 사용하기
이번에는 npm에 올라와 있는 redux-logger를 사용하여 위에서 구현했던 기능을 오픈 소스로 구현해보려고 한다.
npm install redux-logger
◎index.js
import React from 'react';
import ReactDOM from 'react-dom/client';
import './index.css';
import App from './App';
import {applyMiddleware, createStore} from "redux";
import rootReducer from "./modules";
import {Provider} from "react-redux";
import loggerMiddleware from "./lib/loggerMiddleware";
import {createLogger} from 'redux-logger';

const logger = createLogger();
const store = createStore(rootReducer, applyMiddleware(logger));

const root = ReactDOM.createRoot(document.getElementById('root'));
root.render(
    <Provider store={store}>
        <App/>
    </Provider>
);
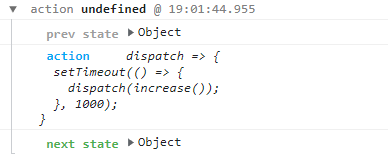
콘솔에 색상도 입혀지고, 액션 디스패치 시간도 나타난다.
리덕스에서 미들웨어를 사용할 때는 이렇게 이미 완성된 미들웨어를 라이브러리로 설치하여 사용하는 경우가 많다.
비동기 작업을 처리하는 미들웨어 사용
미들웨어가 어떤 방식으로 작동하는 지 어느 정도 봤으니, 이제 npm에 공개된 미들웨어를 사용하여 리덕스를 사용하고 있는 프로젝트에서 비동기 작업을 좀 더 효율적으로 관리해보자.
redux-thunk
redux-thunk는 리덕스를 사용하는 프로젝트에서 비동기 작업을 처리할 때 가장 기본적으로 사용하는 미들웨어이다.
Thunk는 특정 작업을 나중에 할 수 있도록 미루기 위해 함수 형태로 감싸는 것을 의미하며 그 예시로 아래 코드를 확인해보자.
만약, 주어진 파라미터에 1을 더하는 함수를 만들고 싶다면 이렇게 작성할 것이다.
const addOne = x => x + 1;
addOne(1);
이 코드를 실행하면 addOne을 호출했을 때 바로 1 + 1이 연산된다. 그런데 이 연산 작업을 나중에 하도록 미루고 싶다면?
thunk를 활용하여 아래와 같이 나중에 연산하도록 미룰 수 있다.
const addOne = x => x + 1;
function addOneThunk(x) {
    const thunk = () => addOne(x);
    return thunk;
}

const fn = addOneThunk(1);
setTimeout(() => {
    const value = fn(); // fn이 실행되는 시점
    console.log(value);
}, 1000);
이를 화살표 함수로만 구현한다면 아래와 같이 작성할 수 있다.
const addOne = x => x + 1;
const addOneThunk = x => () => addOne(x);

const fn = addOneThunk(1);
setTimeout(() => {
    const value = fn(); // fn이 실행되는 시점
    console.log(value);

}, 1000)
redux-thunk 라이브러리를 사용하면 thunk 함수를 만들어서 디스패치할 수 있다.
아래는 redux-thunk 예시 코드이다.
const sampleThunk = () => (dispatch, getState) => {
	// 현재 상태를 참조 가능
    // 새 액션을 디스패치 가능
}
이제 redux-thunk 미들웨어를 설치하고 적용해보자.
npm install redux-thunk
◎index.js
import React from 'react';
import ReactDOM from 'react-dom/client';
import './index.css';
import App from './App';
import {applyMiddleware, createStore} from "redux";
import rootReducer from "./modules";
import {Provider} from "react-redux";
import loggerMiddleware from "./lib/loggerMiddleware";
import {createLogger} from 'redux-logger';
import thunk from 'redux-thunk';

const logger = createLogger();
const store = createStore(rootReducer, applyMiddleware(logger, thunk));

const root = ReactDOM.createRoot(document.getElementById('root'));
root.render(
    <Provider store={store}>
        <App/>
    </Provider>
);
index.js에 thunk를 임포트하여 미들웨어로 넣어준다.
그 다음에 thunk 생성 함수를 만들어야 한다. modules/counter.js에 카운터 값을 비동기적으로 1초 뒤에 변경해줄 함수를 작성해준다.
◎modules/counter.js
import {createAction, handleActions} from "redux-actions";

const INCREASE = 'counter/INCREASE';
const DECREASE = 'counter/DECREASE';

export const increase = createAction(INCREASE);
export const decrease = createAction(DECREASE);

// 1초 뒤에 increase 혹은 decrease 함수를 디스패치함
export const increaseAsync = () => dispatch => {
    setTimeout(() => {
        dispatch(increase());
    }, 1000);
};

export const decreaseAsync = () => dispatch => {
    setTimeout(() => {
        dispatch(decrease());
    }, 1000);
};

const initialState = 0;

const counter = handleActions(
    {
        [INCREASE]: state => state + 1,
        [DECREASE]: state => state - 1
    },
    initialState
);

export default counter;
◎containers/CounterContainer.js
import {connect} from 'react-redux';
import {decreaseAsync, increaseAsync} from "../modules/counter";
import Counter from "../components/Counter";

const CounterContainer = ({number, increaseAsync, decreaseAsync})  => {
    return (
        <Counter number={number} onIncrease={increaseAsync} onDecrease={decreaseAsync} />
    );
};

export default connect(
    state => ({
        number: state.counter
    }),
    {
        increaseAsync,
        decreaseAsync
    }
)(CounterContainer);
이제 본격적으로 thunk의 속성을 활용하여 웹 요청 비동기 작업을 처리해보자.
API를 호출하기 위해 axios 라이브러리를 설치하고, 아래와 같이 jsonplaceholder를 호출할 수 있게 변수를 따로 저장해놓는다.
◎lib/api.js
import axios from 'axios';

export const getPost = id => axios.get(`https://jsonplaceholder.typicode.com/posts/${id}`);

export const getUsers = id => axios.get(`https://jsonplaceholder.typicode.com/users`);
이제 이 API를 사용하여 데이터를 받아와 상태를 관리할 새 리듀서를 생성하는데, 요청을 불러오는 역할을 할 RequestThunk를 아래와 같이 공통 모듈로 사용할 수 있게끔 작성해주자.
◎lib/createRequestThunk.js
export default function createRequestThunk(type, request) {
    const SUCCESS = `${type}_SUCCESS`;
    const FAILURE = `${type}_FAILURE`;

    return params => async dispatch => {
        dispatch({type});
        try{
            const response = await request(params);
            dispatch({
                type: SUCCESS,
                payload: response.data
            });
        } catch(e) {
            dispatch({
                type: FAILURE,
                payload: e,
                error: true
            });
            throw e; //나중에 컴포넌트단에서 에러를 조회할 수 있게 해줌
        }
    }
}
createRequestThunk는 type과 request를 받아서 params를 인자로 받아 type 액션을 디스패치하고 request를 보내는 함수를 반환한다.
이제, 데이터를 받아와 상태를 관리할 리듀서를 작성한다.
◎modules/sample.js
import {handleActions} from 'redux-actions';
import * as api from '../lib/api';
import createRequestThunk from "../lib/createRequestThunk";

// 액션 타입을 선언한다.
// 한 요청당 세 개
const GET_POST = 'sample/GET_POST';
const GET_POST_SUCCESS = 'sample/GET_POST_SUCCESS';
const GET_POST_FAILURE = 'sample/GET_POST_FAILURE';

const GET_USERS = 'sample/GET_USERS';
const GET_USERS_SUCCESS = 'sample/GET_USERS_SUCCESS';
const GET_USERS_FAILURE = 'sample/GET_USERS_FAILURE';

// thunk 함수를 생성한다.
export const getPost = createRequestThunk(GET_POST, api.getPost);
export const getUsers = createRequestThunk(GET_USERS, api.getUsers);

// 초기 상태를 선언한다.
// 요청의 로딩 중 상태는 loading 이라는 객체에서 관리한다.
const initialState = {
    loading: {
        GET_POST: false,
        GET_USERS: false
    },
    post: null,
    users: null
};

const sample = handleActions(
    {
        [GET_POST]: state => ({
            ...state,
            loading: {
                ...state.loading,
                GET_POST: true // 요청 시작
            }
        }),
        [GET_POST_SUCCESS]: (state, action) => ({
            ...state,
            loading: {
                ...state.loading,
                GET_POST: false // 요청 완료
            },
            post: action.payload
        }),
        [GET_POST_FAILURE]: state => ({
            ...state,
            loading: {
                ...state.loading,
                GET_POST: false // 요청 완료
            }
        }),
        [GET_USERS]: state => ({
            ...state,
            loading: {
                ...state.loading,
                GET_USERS: true // 요청 시작
            }
        }),
        [GET_USERS_SUCCESS]: (state, action) => ({
            ...state,
            loading: {
                ...state.loading,
                GET_USERS: false // 요청 완료
            },
            users: action.payload
        }),
        [GET_USERS_FAILURE]: state => ({
            ...state,
            loading: {
                ...state.loading,
                GET_USERS: false // 요청 완료
            }
        })
    },
    initialState
);

export default sample;
◎modules/index.js
import {combineReducers} from "redux";
import counter from "./counter";
import sample from "./sample";

const rootReducer = combineReducers({
    counter,
    sample
});

export default rootReducer;
다음으로 화면에 보여줄 내용인 컴포넌트를 아래와 같이 작성한다.
◎components/Sample.js
const Sample = ({loadingPost, loadingUsers, post, users}) => {
    return (
        <div>
            <section>
                <h1>포스트</h1>
                {loadingPost && '로딩 중...'}
                {!loadingPost&& post && (
                    <div>
                        <h3>{post.title}</h3>
                        <h3>{post.body}</h3>
                    </div>
                )}
            </section>
            <hr/>
            <section>
                <h1>사용자 목록</h1>
                {loadingUsers && '로딩 중...'}
                {!loadingUsers && users && (
                    <ul>
                        {users.map(user => (
                            <li key={user.id}>
                                {user.username} ({user.email})
                            </li>
                        ))}
                    </ul>
                )}
            </section>
        </div>
    );
};

export default Sample;
컴포넌트는 컨테이너가 전달할 loadingPost, loadingUsers 로 현재 요청이 로딩 중인지 아닌지를 판단하고, 로딩이 끝났다면 post와 users 객체가 전달하는 값을 그대로 화면에 표시한다.
이제 컨테이너를 아래와 같이 작성하여 각 리듀서 함수를 connect하고 useEffect로 렌더링이 끝났을 때 getPost, getUsers함수를 실행시키도록 한다.
◎containers/SampleContainer.js
import {connect} from "react-redux";
import Sample from '../components/Sample';
import {getPost, getUsers} from '../modules/sample';
import {useEffect} from "react";

const SampleContainer = ({
    getPost,
    getUsers,
    post,
    users,
    loadingPost,
    loadingUsers
}) => {
    useEffect(() => {
        getPost(1);
        getUsers(1);
    }, [getPost, getUsers]);
    return (
        <Sample
            post={post}
            users={users}
            loadingPost={loadingPost}
            loadingUsers={loadingUsers}
        />
    );
};

export default connect(
    ({sample}) => ({
        post: sample.post,
        users: sample.users,
        loadingPost: sample.loading.GET_POST,
        loadingUsers: sample.loading.GET_USERS
    }),
    {
        getPost,
        getUsers
    }
)(SampleContainer);
◎App.js
import './App.css';
import CounterContainer from "./containers/CounterContainer";
import SampleContainer from "./containers/SampleContainer";

function App() {
  return (
    <>
      <SampleContainer/>
    </>
  );
}

export default App;
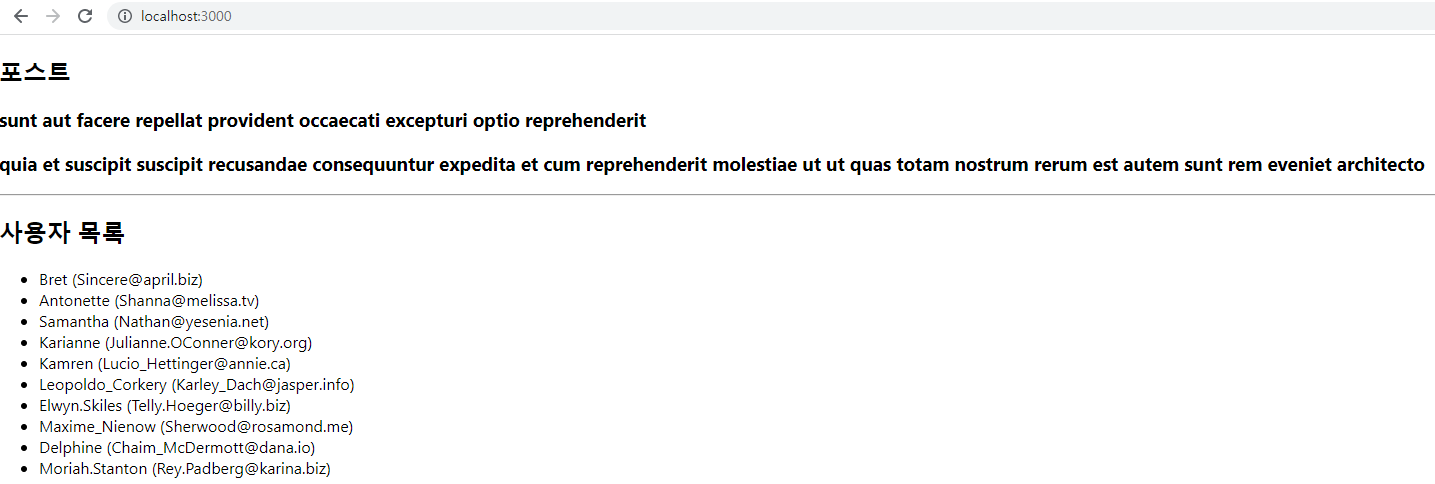
이제 위와 같이 App 컴포넌트에 넣어 렌더링 해보면,

비동기로 요청을 잘 받아오는 걸 확인할 수 있다.
redux-thunk는 함수 형태의 액션을 디스패치하여 미들웨어에서 해당 함수에 스토어의 dispatch와 getState를 파라미터로 넣어서 사용하는 원리이다.
내용이 조금 어렵긴 하지만, 설명이 굳이 없어도 데이터를 한번 잘 따라가 보면 쉽게 이해할 수 있다.
'WEB > React' 카테고리의 다른 글
| [React] Code splitting (0) | 2023.04.06 |
|---|---|
| [React] redux-saga를 사용한 비동기 작업 처리 (0) | 2023.04.04 |
| [React] 리덕스: 리액트 프로젝트에 적용 (0) | 2023.03.31 |
| [React] 리덕스: 사전 지식 (0) | 2023.03.31 |
| [React] Context API (0) | 2023.03.30 |
- react
- 맛집
- 인천 구월동 이탈리안 맛집
- 파니노구스토
- javascript
- await
- Async
- redux
- 이탈리안 레스토랑
- 정보보안기사 #실기 #정리
- redux-thunk
- Promise
- react-native
- 인천 구월동 맛집
- AsyncStorage
- Total
- Today
- Yesterday


