
티스토리 뷰
직전에 다뤘던 Node.js 런타임에 연장선으로 이번엔 DB를 연동해보려고 한다.
원래대로라면 책에 나온대로 MongoDB와 mongoose를 사용하여 Back-end 서버에 연동하려고 했는데, MongoDB가 유료가 된지 꽤 지나서... 그냥 mySql과 많이들 사용한다는 Node.js ORM 도구인 Sequelize를 사용하여 DB를 연동하고, 간단한 CRUD를 구현해보려고 한다.
바로 시작해보자.
Sequelize에 대한 내용은 공식문서인 여기를 참조했으며, 직전 포스팅에서 구현했던 간단한 백엔드 서버를 가지고 실습을 진행하려고 한다.
우선, 아래와 같이 squelize와 mysql 연동을 위한 드라이버, sequelize 커멘드 라인을 위한 cli 까지 설치해주자.
npm install sequelize
npm install sequelize-cli
npm install mysql2
그리고 sequelize를 실행시켜주기만 하면 일단 사용하기 위한 준비는 끝이 난다.
sequelize initsequelize init을 입력하면 프로젝트 내부에 아래와 같은 디렉토리들이 생성이 되는데,
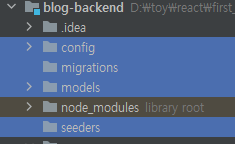
config는 DB Connection, models는 DB 테이블과 동일한 model, migrations는 DB와의 synchronization을 담당하며, seeders는 지금은 사용하지 않으니 삭제한다.
이제 config.json 파일을 열어 아래와 같이 Connection 정보를 작성한다.
◎config/config.json
{
  "development": {
    "username": "root",
    "password": "password",
    "database": "test",
    "host": "localhost",
    "dialect": "mysql"
  }
}
Connection 정보를 입력했으니, models에 있는 index.js를 아래와 같이 작성하여 DB를 연결해주면 된다.
◎models/index.js
const { Sequelize, DataTypes } = require("sequelize");
const env = process.env.NODE_ENV || "development";
const config = require("../config/config.json")[env];

const db = {};

const sequelize = new Sequelize(
    config.database,
    config.username,
    config.password,
    config
);

db.Sequelize = Sequelize;
db.sequelize = sequelize;

sequelize
    .sync({ force: false })
    .then(() => {
      console.log("데이터베이스 연결됨.");
      module.exports = db;
    })
    .catch((err) => {
      console.error(err);
    });

module.exports = db;
여기서 exports 한 db 객체를 외부에서 사용하여 각 DB 쿼리를 날리도록 기능을 구현하는 것이다.
그리고 src에 있는 index가 이 models/index.js를 호출할 수 있게 require 함수로 불러와줘야 한다.
◎src/index.js
const Koa = require('koa');
const Router = require('koa-router');
const bodyParser = require('koa-bodyparser');
const api = require('./api');

const app = new Koa();
const router = new Router();

router.use('/api', api.routes());

require("../models");

// 라우터 적용 적엔 bodyParser 적용
app.use(bodyParser());

// app 인스턴스에 라우터 적용
app.use(router.routes()).use(router.allowedMethods());

app.listen(4000, () => {
    console.log('Listening to port 4000');
});
이제 DB에 posts라는 테스트 테이블을 하나 만들고, 이 테이블을 대신할 모델 객체를 아래와 같이 작성하자.
ORM이기 때문에 테이블을 대표할 모델 객체가 반드시 필요하며, 보통 Table 이름(Table명이 복수이면 단수로 모델명을 짓는다) 으로 만들지만 굳이 동일하게 만들지 않아도 되며, 테이블 이름을 따로 지정하지 않거나 단수형으로 작성하면 sequelize가 자체적으로 모델이름에 s가 붙은 테이블을 찾는다.
자동으로 복수화하는 것을 중지시킬 수도, 테이블을 직접 지정할 수도 있다.
이에 대한 자세한 정보는 위 레퍼런스에서 확인할 수 있다.
◎models/Post.js
module.exports = (sequelize, DataTypes) => (
    sequelize.define(
        "Post",
        {
            id: {
                type: DataTypes.INTEGER,
                allowNull: false,
                autoIncrement: true,
                primaryKey: true
            },
            title: {
                type: DataTypes.STRING(100),
                allowNull: false
            },
            body: {
                type: DataTypes.STRING
            }
        },
        {
            timestamps: false
        }
    )
);
위와 같이 define 함수를 사용하여 모델을 만들어주고, index에 위 모델을 만들 함수를 호출하는 코드를 작성하여 모델을 불러온다.
◎models/index.js
const Posts = require("./Post")(sequelize, DataTypes);

db.post = Posts;
이제 모든 준비가 끝이 났다.
테이블과 맵핑된 모델이 있고, DB연결도 끝났으니 post 컨트롤러에서 이전에 임시로 만든 배열을 제거하고 아래와 같이 DB 테이블에 대한 CRUD 작업을 구현해주자.
◎src/api/posts/posts.ctrl.js
const db = require("../../../models");

const Post = db.post;
/*
* 포스트 작성
* POST /api/posts
* {title, body}
* */
exports.write = async ctx => {
    // REST API의 Request Body는 ctx.request.body에서 조회할 수 있다.
    const {title, body} = ctx.request.body;

    ctx.body = await Post.create({
        title: title,
        body: body
    }).catch(e => console.log(e));
};

/*
* 포스트 목록 조회
* GET /api/posts
* */
exports.list = async ctx => {
    ctx.body = await Post.findAll({}).catch(e => console.log(e));
};

/*
* 특정 포스트 조회
* GET /api/posts/:id
* */
exports.read = async ctx => {
    const {id} = ctx.params;

    const post = await Post.findOne({where: {id: id}}).catch(e => console.log(e));

    if(!post) {
        ctx.status = 404;
        ctx.body = {
            message: '포스트가 존재하지 않습니다.'
        };
        return;
    }
    ctx.body = post;
};

/*
* 특정 포스트 제거
* DELETE /api/posts/:id
* */
exports.remove = async ctx => {
    const {id} = ctx.params;

    const post = await Post.destroy({where: {id: id}}).catch(e=>{
        ctx.status = 404;
        ctx.body = {
            message: '포스트가 존재하지 않습니다.'
        };
    });

    ctx.status = 204;
    ctx.body = {
        message: '삭제 완료',
        post: post
    }
};

/*
* 특정 포스트 수정
*  /api/posts/:id
* {title, body}
* */
exports.update = async ctx => {
    const{id} = ctx.params;

    const post = await Post.update({...ctx.request.body}, {where: {id: id}});

    if(!post) {
        ctx.status = 404;
        ctx.body = {
            message: '포스트가 존재하지 않습니다.'
        };
        return;
    }
    ctx.body = post;
};
◎src/api/posts/index.js
const Router = require('koa-router');
const postsCtrl = require('./posts.ctrl');
const posts = new Router();

posts.get('/', postsCtrl.list);
posts.post('/', postsCtrl.write);
posts.get('/:id', postsCtrl.read);
posts.delete('/:id', postsCtrl.remove);
posts.patch('/:id', postsCtrl.update);

module.exports = posts
이제 서버를 올려주면,
Listening to port 4000
(node:13240) [SEQUELIZE0006] DeprecationWarning: This database engine version is not supported, please update your database
server. More information https://github.com/sequelize/sequelize/blob/main/ENGINE.md
(Use `node --trace-deprecation ...` to show where the warning was created)
Executing (default): SELECT TABLE_NAME FROM INFORMATION_SCHEMA.TABLES WHERE TABLE_TYPE = 'BASE TABLE' AND TABLE_NAME = 'Post
s' AND TABLE_SCHEMA = 'test'
Executing (default): SHOW INDEX FROM `Posts` FROM `test`
데이터베이스 연결됨.
이와 같이 DB가 잘 연결된 걸 확인할 수 있다.
각 요청을 확인해보면,

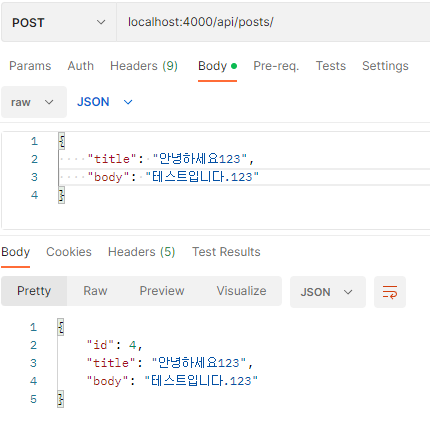
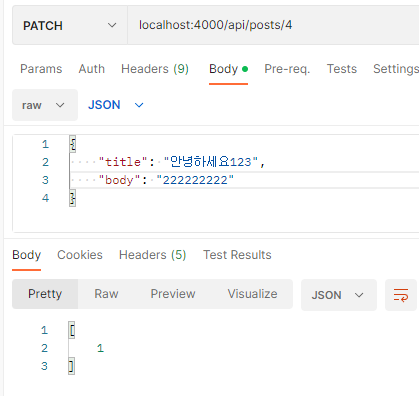
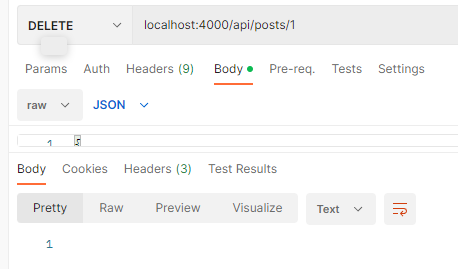

CRUD 기능이 모두 잘 구현된 걸 확인할 수 있다.
DB도 해당 데이터가 잘 들어갔다.
'WEB > Node' 카테고리의 다른 글
| [Node] 인증 관리: JWT(JSON Web Token) (0) | 2023.04.11 |
|---|---|
| [Node] Backend server: Koa (0) | 2023.04.10 |

- AsyncStorage
- 정보보안기사 #실기 #정리
- 이탈리안 레스토랑
- redux
- 인천 구월동 이탈리안 맛집
- javascript
- Promise
- redux-thunk
- 맛집
- Async
- react
- 인천 구월동 맛집
- react-native
- 파니노구스토
- await
- Total
- Today
- Yesterday