티스토리 뷰
당연한 이야기지만, 안드로이드도 다른 웹이나 윈도우 어플리케이션과 동일하게 사용자의 동작에 대한 이벤트를 처리할 수 있다.
기본적으로 안드로이드에서 이벤트는 JAVA 코드에서 각 Event Listener Interface 를 구현받아 재정의하고, 해당 리스너를 Event를 구현할 객체에 설정해준다.
Android App 개발 시에 대표적으로 사용되는 Events를 정리하면 다음과 같다.
| 속성 | 설명 |
| Touch Event | 화면을 손가락으로 누를 때 발생 |
| Key Event | 키패드나 하드웨어 버튼을 누를 때 발생하는 이벤트 |
| Gesture Event | 터치 이벤트 중에서 스크롤과 같이 일정 패턴으로 구분되는 이벤트 |
| Focus | 뷰마다 순서대로 주어지는 포커스 |
| 화면 방향 변경 | 화면의 방향이 가로와 세로로 바뀜에 따라 발생하는 이벤트 |
Gesture Event 는 일반적인 Touch Event 보다 훨씬 더 세부적으로 사용자의 입력을 처리할 수 있다.
Gesture Event가 처리할 수 있는 Event의 유형은 다음과 같다.
| 메서드 | Event 유형 |
| onDown() | 화면이 눌렸을 경우 |
| onShowPress() | 화면이 눌렸다 떼어지는 경우 |
| onSingleTapUp() | 화면이 한 손가락으로 눌렸다 떼어지는 경우 |
| onSingleTapConfirmed | 화면이 한 손가락으로 눌려지는 경우 |
| onDoubleTap() | 화면이 두 손가락으로 눌려지는 경우 |
| onDoubleTapEvent() | 화면이 두 손가락으로 눌려진 상태에서 떼거나 이동하는 등 세부적인 액션을 취하는 경우 |
| onScroll() | 화면이 눌린 채 일정한 속도와 방향으로 움직였다 떼는 경우 |
| onFling() | 화면이 눌린 채 가속도를 붙여 손가락을 움직였다 떼는 경우 |
| onLongPress() | 화면을 손가락으로 오래 누르는 경우 |
이제 기본적인 예제들을 살펴보자
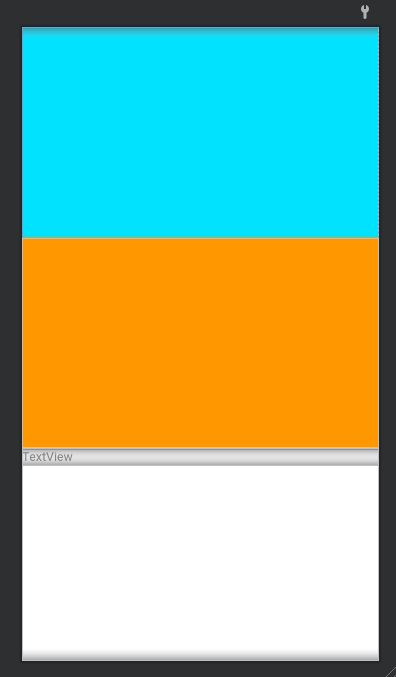
Event를 설정해주기 전에 Touch 및 Gesture, Key Events를 삽입할 레이아웃을 먼저 구성해주면,
◎activity_main.xml
<?xml version="1.0" encoding="utf-8"?>
<LinearLayout
        xmlns:android="http://schemas.android.com/apk/res/android"
        xmlns:tools="http://schemas.android.com/tools"
        xmlns:app="http://schemas.android.com/apk/res-auto"
        android:layout_width="match_parent"
        android:layout_height="match_parent"
        tools:context=".MainActivity" android:orientation="vertical">
    <View
            android:layout_width="match_parent"
            android:layout_height="243dp" android:id="@+id/view2" android:background="#00E2FF"/>
    <View
            android:layout_width="match_parent"
            android:layout_height="243dp" android:id="@+id/view" android:background="#FF9800"/>
    <ScrollView
            android:layout_width="match_parent"
            android:layout_height="match_parent">
        <LinearLayout android:layout_width="match_parent" android:layout_height="wrap_content"
                      android:orientation="vertical">
            <TextView
                    android:layout_width="match_parent"
                    android:layout_height="match_parent" android:id="@+id/textView"/>
        </LinearLayout>
    </ScrollView>
</LinearLayout>
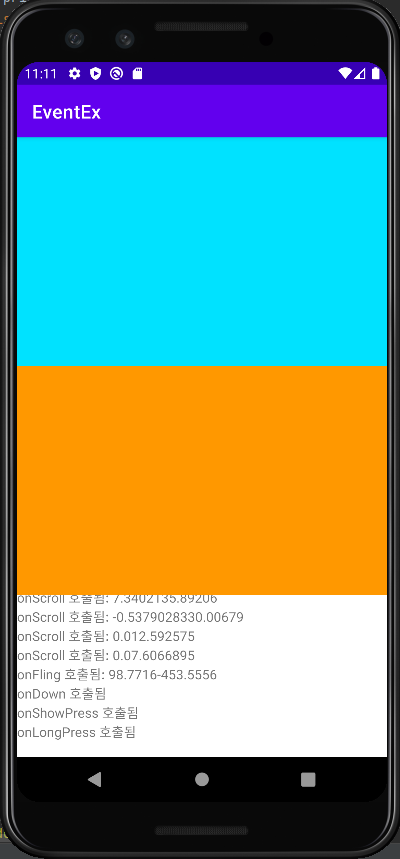
위와 같은 레이아웃을 구성한 뒤, 각 스크린을 터치할 때마다 해당 Event 와 좌표를 TextView에 삽입하여 표시하는 간단한 예제를 구성해보려고 한다.
▶Touch Event
◎MainActivity.java
package com.example.eventex;

import android.view.MotionEvent;
import android.view.View;
import android.widget.TextView;
import androidx.appcompat.app.AppCompatActivity;
import android.os.Bundle;

public class MainActivity extends AppCompatActivity {
    TextView textView;

    @Override
    protected void onCreate(Bundle savedInstanceState) {
        super.onCreate(savedInstanceState);
        setContentView(R.layout.activity_main);

        textView = findViewById(R.id.textView);
        View view = findViewById(R.id.view);

        view.setOnTouchListener(new View.OnTouchListener() {

            @Override
            public boolean onTouch(View v, MotionEvent event) {
                int action = event.getAction();

                float curX = event.getX();
                float curY = event.getY();

                if (action == MotionEvent.ACTION_DOWN) {
                    printText("손가락 눌림" + curX + curY);
                } else if (action == MotionEvent.ACTION_MOVE) {
                    printText("손가락 움직임" + curX + curY);
                } else if (action == MotionEvent.ACTION_UP) {
                    printText("손가락 뗌" + curX + curY);
                }

                return true;
            }
        });
    }

    public void printText(String str) {
        textView.append(str + "\n");
    }
}
위와 같이 View 객체를 선언 후, onTouch 메서드를 재정의한 OnTouchListener를 설정해주면 된다.

▶Gesture Event
◎MainActivity.java
package com.example.eventex;

import android.view.GestureDetector;
import android.view.MotionEvent;
import android.view.View;
import android.widget.TextView;
import androidx.appcompat.app.AppCompatActivity;
import android.os.Bundle;

public class MainActivity extends AppCompatActivity {
    TextView textView;

    GestureDetector detector;

    @Override
    protected void onCreate(Bundle savedInstanceState) {
        super.onCreate(savedInstanceState);
        setContentView(R.layout.activity_main);

        textView = findViewById(R.id.textView);
        View view = findViewById(R.id.view);

        view.setOnTouchListener(new View.OnTouchListener() {

            @Override
            public boolean onTouch(View v, MotionEvent event) {
                int action = event.getAction();

                float curX = event.getX();
                float curY = event.getY();

                if (action == MotionEvent.ACTION_DOWN) {
                    printText("손가락 눌림" + curX + curY);
                } else if (action == MotionEvent.ACTION_MOVE) {
                    printText("손가락 움직임" + curX + curY);
                } else if (action == MotionEvent.ACTION_UP) {
                    printText("손가락 뗌" + curX + curY);
                }

                return true;
            }
        });

        detector = new GestureDetector(this, new GestureDetector.OnGestureListener() {
            @Override
            public boolean onDown(MotionEvent e) {
                printText("onDown 호출됨");
                return true;
            }

            @Override
            public void onShowPress(MotionEvent e) {
                printText("onShowPress 호출됨");
            }

            @Override
            public boolean onSingleTapUp(MotionEvent e) {
                printText("onSingleTapUp 호출됨");
                return true;
            }

            @Override
            public boolean onScroll(MotionEvent e1, MotionEvent e2, float distanceX, float distanceY) {
                printText("onScroll 호출됨: " + distanceX + distanceY);
                return true;
            }

            @Override
            public void onLongPress(MotionEvent e) {
                printText("onLongPress 호출됨");
            }

            @Override
            public boolean onFling(MotionEvent e1, MotionEvent e2, float velocityX, float velocityY) {
                printText("onFling 호출됨: " + velocityX + velocityY);
                return true;
            }
        });

        View view2 = findViewById(R.id.view2);

        view2.setOnTouchListener(new View.OnTouchListener() {

            @Override
            public boolean onTouch(View v, MotionEvent event) {
                detector.onTouchEvent(event);
                return true;
            }
        });
    }

    public void printText(String str) {
        textView.append(str + "\n");
    }
}
Gesture Eventsms GestureDetector 객체를 호출하여 메서드를 재정의 해야한다. 그 후에 마찬가지로 onTouch 리스너를 View에 설정해주면 되는데, 이때 Detector객체의 onTouchEvent가 호출되도록 하면 된다.

▶Key Event
마찬가지로 키 입력도 onKeyDown() 메서드를 재정의하여 처리하면 된다.
◎MainActivity.java
package com.example.eventex;

import android.view.GestureDetector;
import android.view.KeyEvent;
import android.view.MotionEvent;
import android.view.View;
import android.widget.TextView;
import android.widget.Toast;
import androidx.appcompat.app.AppCompatActivity;
import android.os.Bundle;

public class MainActivity extends AppCompatActivity {
    TextView textView;

    GestureDetector detector;

    @Override
    protected void onCreate(Bundle savedInstanceState) {
        super.onCreate(savedInstanceState);
        setContentView(R.layout.activity_main);

        textView = findViewById(R.id.textView);
        View view = findViewById(R.id.view);

        view.setOnTouchListener(new View.OnTouchListener() {

            @Override
            public boolean onTouch(View v, MotionEvent event) {
                int action = event.getAction();

                float curX = event.getX();
                float curY = event.getY();

                if (action == MotionEvent.ACTION_DOWN) {
                    printText("손가락 눌림" + curX + curY);
                } else if (action == MotionEvent.ACTION_MOVE) {
                    printText("손가락 움직임" + curX + curY);
                } else if (action == MotionEvent.ACTION_UP) {
                    printText("손가락 뗌" + curX + curY);
                }

                return true;
            }
        });

        detector = new GestureDetector(this, new GestureDetector.OnGestureListener() {
            @Override
            public boolean onDown(MotionEvent e) {
                printText("onDown 호출됨");
                return true;
            }

            @Override
            public void onShowPress(MotionEvent e) {
                printText("onShowPress 호출됨");
            }

            @Override
            public boolean onSingleTapUp(MotionEvent e) {
                printText("onSingleTapUp 호출됨");
                return true;
            }

            @Override
            public boolean onScroll(MotionEvent e1, MotionEvent e2, float distanceX, float distanceY) {
                printText("onScroll 호출됨: " + distanceX + distanceY);
                return true;
            }

            @Override
            public void onLongPress(MotionEvent e) {
                printText("onLongPress 호출됨");
            }

            @Override
            public boolean onFling(MotionEvent e1, MotionEvent e2, float velocityX, float velocityY) {
                printText("onFling 호출됨: " + velocityX + velocityY);
                return true;
            }
        });

        View view2 = findViewById(R.id.view2);

        view2.setOnTouchListener(new View.OnTouchListener() {

            @Override
            public boolean onTouch(View v, MotionEvent event) {
                detector.onTouchEvent(event);
                return true;
            }
        });
    }

    @Override
    public boolean onKeyDown(int keyCode, KeyEvent event){
        if(keyCode == KeyEvent.KEYCODE_BACK) {
            Toast.makeText(this, "시스템 [BACK] 버튼이 눌렸습니다.",
                    Toast.LENGTH_LONG).show();
            return true;
        }
        return false;
    }

    public void printText(String str) {
        textView.append(str + "\n");
    }
}
'Mobile > Android' 카테고리의 다른 글
| [Android] Toast & Snackbar 1: Toast View 위치 변경 (0) | 2022.03.17 |
|---|---|
| [Android] Event 2:화면 전환 Event 처리 (0) | 2022.03.17 |
| [Android] 기본 위젯 사용 예제 4: Drawable Object (0) | 2022.03.14 |
| [Android] 기본 위젯 사용 예제 3: image view & image button (0) | 2022.03.14 |
| [Android] 기본 위젯 사용 예제 2: plain text (0) | 2022.03.14 |
- 파니노구스토
- Promise
- 인천 구월동 맛집
- 이탈리안 레스토랑
- react-native
- react
- Async
- 맛집
- redux-thunk
- await
- 정보보안기사 #실기 #정리
- AsyncStorage
- 인천 구월동 이탈리안 맛집
- javascript
- redux
- Total
- Today
- Yesterday


